
Have you been looking out for a scenario where you want to export Microsoft Teams Chat conversation, could be a 1 on 1 chat, Group Chat or a meeting conversation to a CSV format. For conversation or messages in a Teams team, there are commands available in CLI for Microsoft 365 through which you can export the conversations easily.
Imagine a case where you want to export a chat conversation which you had with a colleague. Or if you want to document a QnA session after a Technical event. A typical example is our PnP Calls where moderator needs to get the questions asked by the attendees easily.
If we are able to get a way where we can export the raw conversations into an CSV and then you can slice, dice, or format the details as per your requirement. This blog post explains how you do that using a simple script built using PowerShell in combination with CLI for Microsoft 365. During the time of writing this blog, there are no commands available which you can leverage directly.
But there is a new command which is getting brewed in the backyard of CLI for Microsoft 365 which will give you the feature directly. Do keep an eye on CLI for Microsoft 365 release notes.
But till that time, you can refer this blog post where we use Combination of CLI for Microsoft 365 and Graph API calls for getting the result. I have built this script in PowerShell. But you can easily extend it to any other shells based on your convenience.
Export Microsoft Teams Chat approach in a nutshell
1. Add AAD App using CLI for Microsoft 365
2. Login to Azure AD using CLI for Microsoft 365
3. Get the Access Token for Graph API using CLI for Microsoft 365
4. Use the access token and call the Graph API which to export the conversation
If you are interested only in the complete script, you can head straight to Complete Scripts section
1. Add AAD App using CLI for Microsoft 365
Since we will be using Graph API for Listing the messages in a chat, we need the Delegated Permissions Chat.Read, Chat.ReadWrite, for the same. That being the case, here will be creating an AAD App and will be assigning the permission. If you already have an App with the needed API permission assigned, you can ignore the below step and can head directly to 2. Login to Azure AD using CLI for Microsoft 365.
CLI for Microsoft 365 provides an easy way to create an Azure AD App with single command. We will be using the command m365 aad app add for the same.
This approach provides a way to create an app using a Manifest file and also providing the API permission while creating the app.
If you want to understand various ways to create Azure AD App, you can refer brilliant blog post by Waldek where he has explained with various use cases.
Following is the code snippet which creates a new AAD App. Manifest file which I have used is given here.
$AddedApp = (m365 aad app add --manifest $AppManifestJSONFile
  --redirectUris "https://login.microsoftonline.com/common/oauth2/nativeclient"
   --platform publicClient --apisDelegated "https://graph.microsoft.com/User.Read,https://graph.microsoft.com/Chat.Read, https://graph.microsoft.com/Chat.ReadWrite"--output> json) | ConvertFrom-Json
Once we have the App created in place, in the next step, we will be connecting to CLI for Microsoft 365 using the newly created app.
2. Login to Azure AD using CLI for Microsoft 365
By default CLI for Microsoft 365 uses an App named PnP Management Shell for connecting to Microsoft 365. But while writing this blog, App does not have the API permission (Chat.Read, Chat.ReadWrite) assigned. But CLI for Microsoft 365 provides a way where you can use your own Azure AD identity for leveraging the commands which CLI for Microsoft 365 uses. Since we have already created an AAD App in section Add AAD App using CLI for Microsoft 365, we will just be logging into Microsoft 365 using CLI for M365. If you already have an AAD App which you have created before, you can refer the documentation where it has explained how to configure the needed settings.
For logging in to CLI for Microsoft 365, we use the following command
m365 login --appId $CustomAADAppId --tenant $AppTenantId
CustomAADAppId- App id of the App which you have created.
AppTenantId- Tenant ID of the Azure AD. If you have already logged in to M365 using CLI for Microsoft 365, you can use the command
m365 tenant id get
- Tenant ID of the Azure AD. If you have already logged in to M365 using CLI for Microsoft 365, you can use the command
When you you login for the first time after creating the App, you will be asked to consent the needed permission.
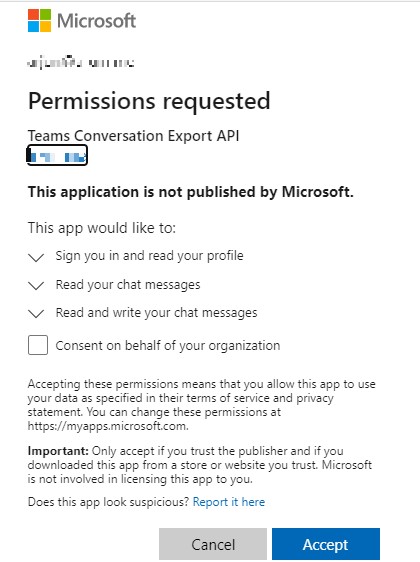
Once you accept, you will be logged in to Microsoft 365 using the App which you have created / configured.
3. Get the Access Token for Graph API using CLI for Microsoft 365
Once you have logged in you can fetch the access token for Graph API using the command, m365 util accesstoken get which will fetch you the accesstoken needed for consuming the Graph API. Your command may look something like below
#Getting AccessToken for the API Call
$AccessToken = m365 util accesstoken get --resource https://graph.microsoft.com --new
4. Use the access token and call the Graph API which to the conversation
Once you have the accesstoken, you will be calling the Graph API endpoint using Invoke-RestMethod PowerShell command.
# Method which retrieves a particular Teams Conversation and Exports to CSV
function getMessagesFromConversation{
    param (
        [Parameter(Mandatory = $false)]
        [string]$ConversationURL,
        [Parameter(Mandatory)]
        [string]$AccessToken,
        [Parameter(Mandatory)]
        [string]$ChatID
    )

    $NextConversationURL = $null
    if ([string]::IsNullOrEmpty($ConversationURL))
    {
        $NextConversationURL = "https://graph.microsoft.com/v1.0/chats/$ChatID/messages?$top=50"
    }
    else
    {
        $NextConversationURL = $ConversationURL
    }

    Write-Host "URL : $NextConversationURL"

    $Headers = @{
    'Content-Type' = 'application/json'
    'Authorization' = 'Bearer ' + $AccessToken
    }

    $GraphResponse = Invoke-RestMethod -Uri $NextConversationURL -Headers $Headers -Method Get

    #Write-Host $GraphResponse.value
    $GraphResponse.value   |  Select-Object  @{Name="Sent Date"; Expression={Get-Date $_.createdDateTime -Format "MM/dd/yyyy HH:mm:ss "}}, @{Name="Attendee"; Expression={ $_.from.user.displayName }},  @{Name="Chat Content"; Expression={$_.body.content}},  @{Name="Is Reply"; Expression={$_.attachments.contentType}}, @{Name="Reply Content"; Expression={$_.attachments.content}} | Export-Csv "$PSScriptRoot\ExportedChats.csv" -Append

    if($GraphResponse.'@odata.count' -gt 0)
    {
        getMessagesFromConversation  -ConversationURL $GraphResponse.'@odata.nextLink' -AccessToken $AccessToken -ChatID $ChatId
    }
}

#Chat Conversations which needs to be retrieved
$ChatId = "19:2a1a111e-9b3a-4694-93ca-01e364a79abf_8bc5c293-4208-414e-9837-718a0385be6b@unq.gbl.spaces"
getMessagesFromConversation -AccessToken $AccessToken -ChatID $ChatId
You can easily get the Chat Id of any conversation by opening the Teams Conversation in a browser

Your URL may look something like below,
https://teams.microsoft.com/_#/conversations19:meeting_Y2JiNjMzZTEtYmVkZC00MGQxLWJjMTctYjI1MGE0ZTQzZmJj@thread.v2?ctx=chat
In the above URL, conversation id would 19:meeting_Y2JiNjMzZTEtYmVkZC00MGQxLWJjMTctYjI1MGE0ZTQzZmJj@thread.v2
Once you pass the id, you will be able to generate the complete conversation history to a CSV.
Complete Script
The below sript below will create an Azure AD App for exporting the conversation. If you already have an App, ensure that you comment lines from 95 to line 101. Then uncomment line 103 and 104 after updating the GUID of the App in line 104.
Script uses manifest file for creating AAD App and you can refer the manifest file used in the script from here.
Complete script for Exporting Conversation
Manifest File - Creating App
Photo by Glenn Carstens-Peters on Unsplash