
Continuous Integration and Continuous deployment (CI/CD) is an integral part of any development. This would be the case especially if you have a setup where build and releases are part of a seamless process. In this blog, I am explaining how to have a CI/CD setup for SharePoint Framework (SPFx) development. Here we are using Azure DevOps for the process. The concept/scripts used in the blog could very well be re-used in GitHub, GitLab, or any other DevOps setup. For the SharePoint-related actions, we will be using CLI for Microsoft 365 for installing and deploying the App.
There is already an amazing Microsoft documentation for CI / CD in SPFx which even talks about integrating Test cases to your Build Pipeline. I will not be covering those in this blog. One caveat which I felt in the Microsoft documentation is on the authentication approach where for authentication, the authentication approach is using Username and Password. But in most of the real-time scenarios, that approach will not be recommended. In this blog for authenticating with SharePoint online, we will be using the Certificate-based authentication which will be the typical scenario for the real-time scenarios for deployment.
I will not be covering the details of the Azure DevOps pipeline in this blog. You can get more details about DevOps from THIS LINK. In this blog I am focusing only on the deployment of SharePoint Framework (SPFx) packages to your Site Collection App catalog.
If you are interested only in referring the sample project, you can go ahead to Sample Project Structure section.
Pre-requisites in Azure DevOps
Following are the environment information which are used here for the Build and Release process in DevOps
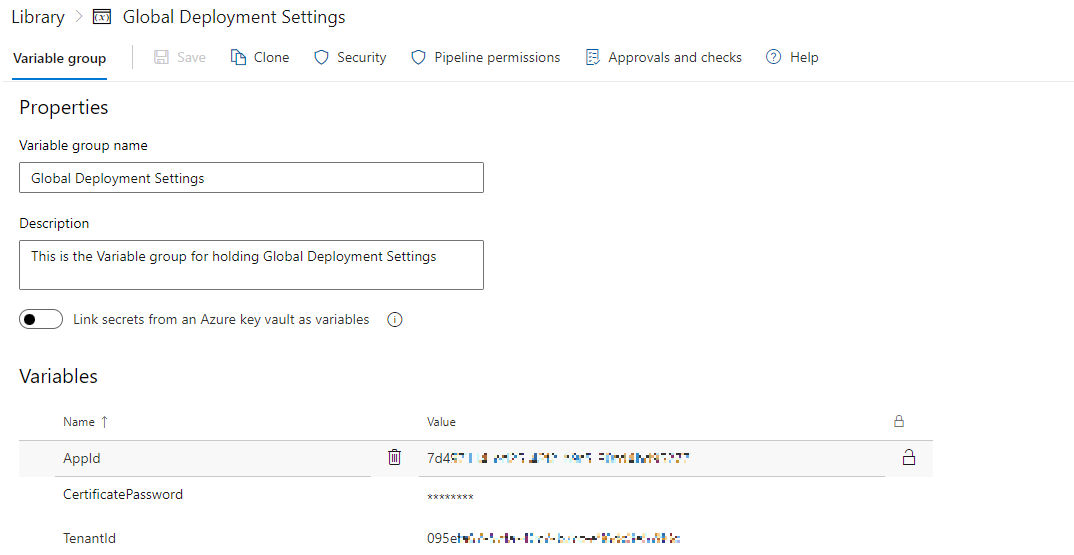
Variable Group
-
Global Deployment setting
- For the tenant and authentication related configuration
- Screenshot of the same is given below
-
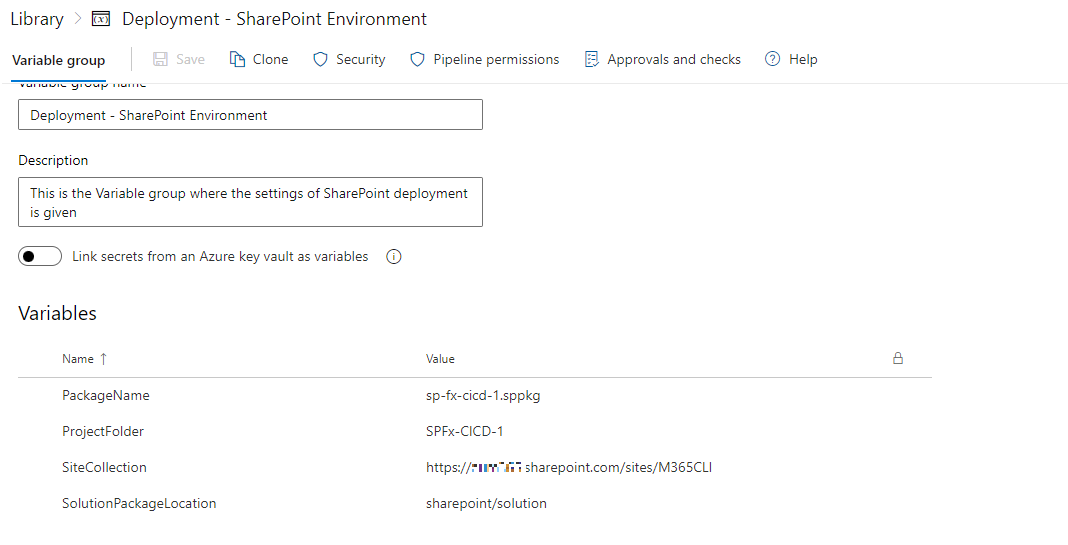
SharePoint Variable Group
- For the SharePoint settings like SharePoint site collection, App Catalog information etc.
- Screenshot of the same is given below
Secure File
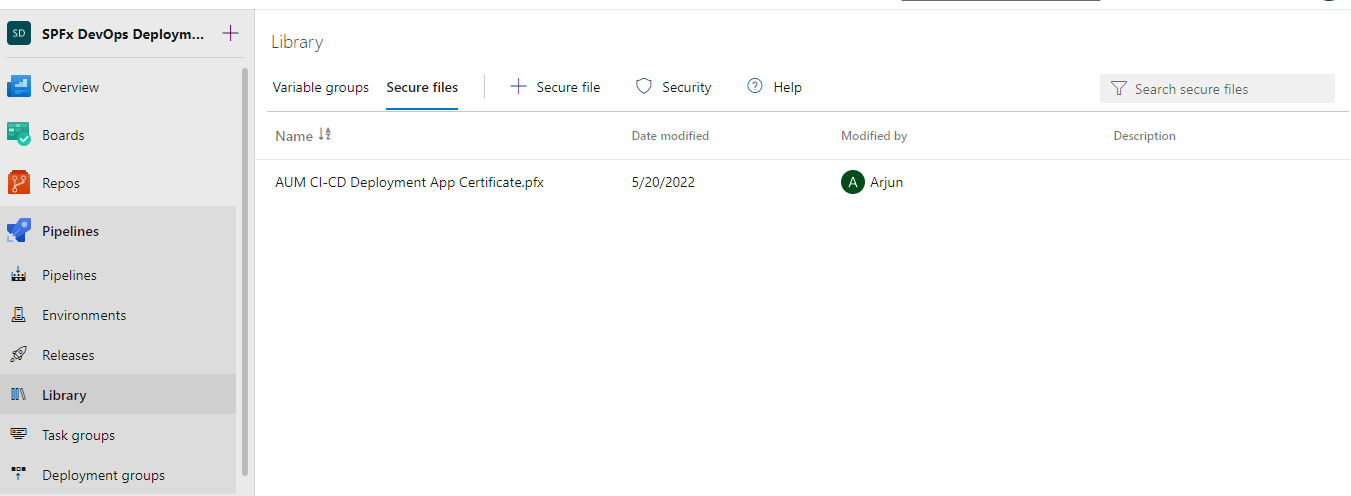
- Certificate (Certificate.pfx)
- We will be using a password enabled Certificate for authenticating against Microsoft 365
- Certificate which will be generated will be uploaded here. For details on the script which generates certificate, refer Certificate Generation section
One-time setup for authentication
As mentioned above, we will be using Certificate based authentication on the whole process. In the blog, we will be using Self-Signed Certificate for authentication. This is not recommended in Production setup. Some of the actions which will be done for the process are as below
1. Generate self-signedCertificate
For this Proof of Concept, we will be generating a Self-signed Certificate. In production scenarios, you may have to use the actual certificate rather than a self-generated one. The command for generating the certificate will be like below
.\Create-SelfSignedCertificate.ps1 -CommonName "SPFx CI-CD Deployment App Certificate" -StartDate "2022-02-02" -EndDate "2023-10-02" -Password "TempP@ssw0rd"
Script for generation of certificate goes below
2. Create Azure Active Directory App (AAD App)
For the CI/CD process, we will be creating a new Azure AAD App and the same App will be used for authenticating against Microsoft 365 / SharePoint Online. We will be creating Azure AAD App using CLI for Microsoft 365. Necessary API Permission and admin consent also would be done in the same code. CLI for Microsoft 365 provides a way where the admin can consent automatically during the AAD App creation. Command also provides a way to add a certificate to the AAD App so that the same certificate could be used for authenticating against Microsoft 365. Following is the complete code which is used for creating the App.
.\aad-app-add-aadapp.ps1 -AppName "AUM CI-CD Deployment App" -CertificatePath ".\AUM CI-CD Deployment App Certificate.pfx" -CertificatePassword "TempP@ssw0rd" -AutoAdminConsent
The complete script for creating AAD App goes below
In the release pipeline, we will be using CLI for Microsoft 365 with Certificate based authentication for logging into the Microsoft 365.
Build Pipeline
I have not given the details about the trigger which needs to be used here since that would be dependent on your deployment scenarios.
In my case, for the build process, the steps will be as follow
- Install Node.JS
- Install NPM in the SPFx project
- Bundle solution using Gulp Task
- Package solution using Gulp Task
- Copy package files to the DevOps drop folder
- Copy Script files to DevOps drop folder
- We will be using a PowerShell script for deploying.
- Files will be part of complete project and the same will be copied to the Drop location for execution
- Publish the files to be available for Release Pipeline
The complete YAML is given below.
Release Pipeline
The overall configuration of my release pipeline will be like the below.
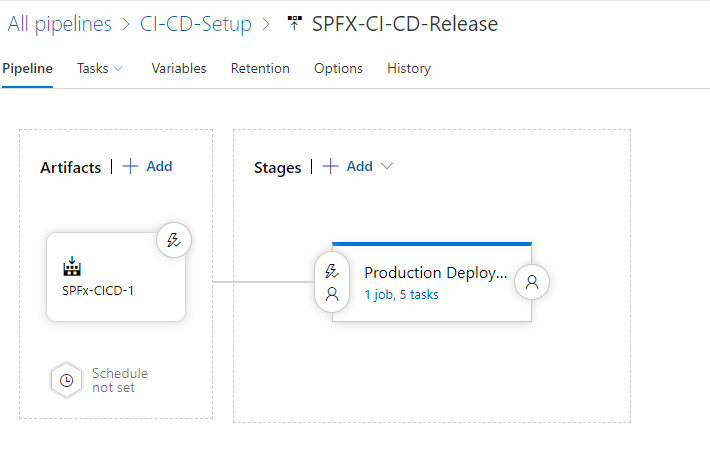
You can have multiple stages or configure Deployment Gates if needed. For me, the purpose is to show the possibility, I have not configured extensive an Release setup.
Agent
In this blog, I am using ubuntu-20.04 agent. In your case, you can use any agents based on your use case.

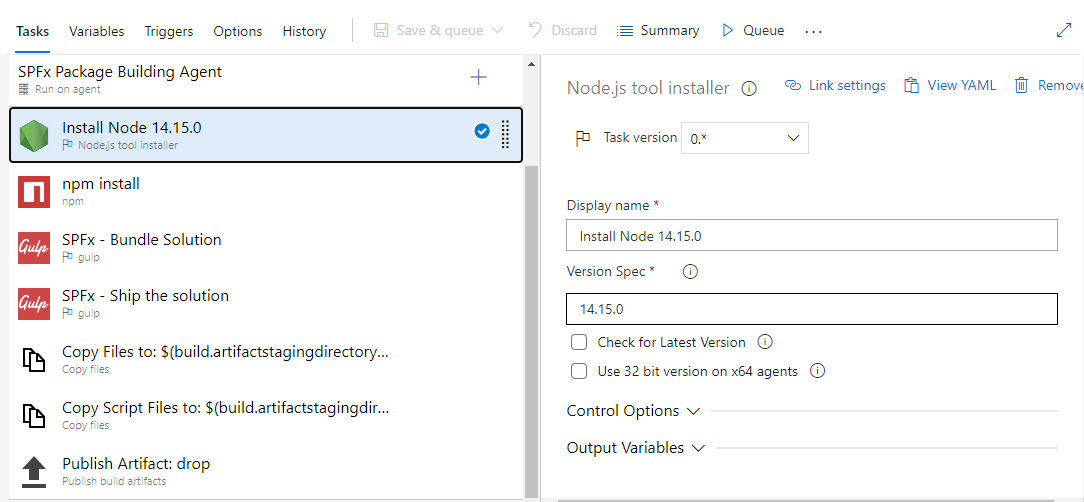
Tasks
Tasks which is used in my release pipeline are given below. I am giving a screenshot and YAML code so that you will be able to configure it pretty easily
1. Node.js Tool Installer task
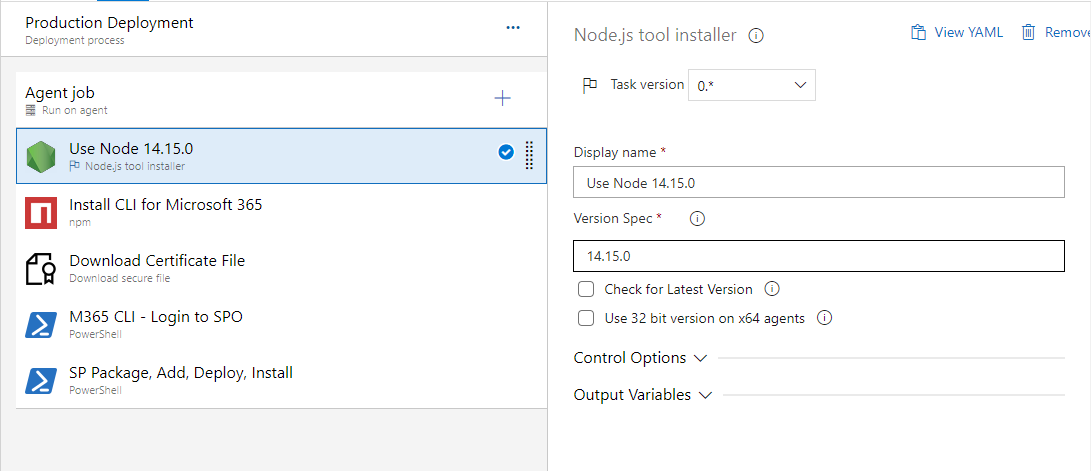
YAML Code
steps:
- task: NodeTool@0
  displayName: 'Use Node 14.15.0'
  inputs:
    versionSpec: 14.15.0
2. NPM Task
We will be using CLI for Microsoft 365 for bundling and packaging solutions. CLI for Microsoft 365 is an awesome cross-platform CLI that allows users on any platform to manage various configuration settings of Microsoft 365. You can get more details about CLI for Microsoft 365 from this link In this task, we will be installing CLI for Microsoft 365
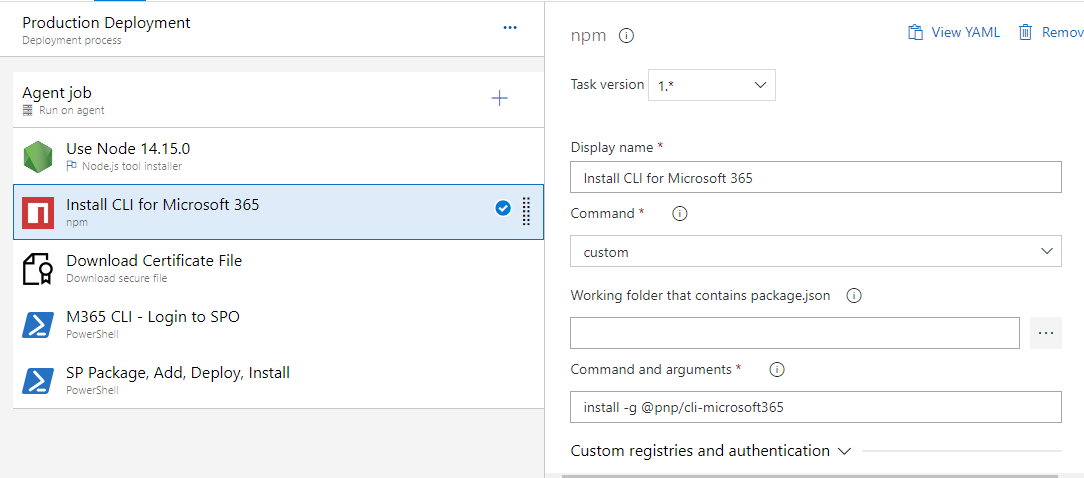
YAML Code
steps:
- task: Npm@1
  displayName: 'Install CLI for Microsoft 365'
  inputs:
    command: custom
    verbose: false
    customCommand: 'install -g @pnp/cli-microsoft365'
3. Download secure file
As explained in the One Time Setup for authentication, we will be using Certificate-based authentication for logging into the SharePoint site collection for deploying your SPFx package. In this step, we will be downloading the same secured files so that they could be used for logging into Microsoft 365. The file will already be uploaded in the secured file
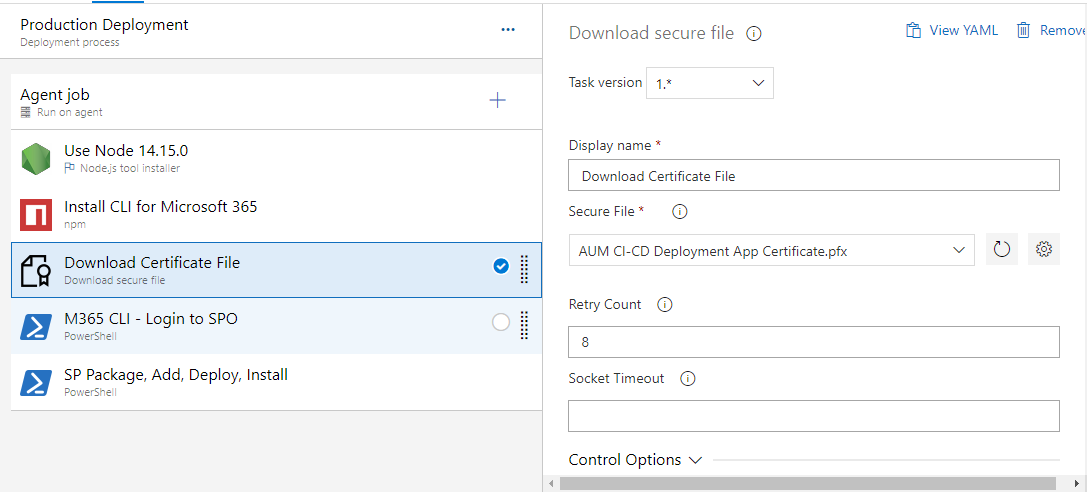
YAML Code
steps:
- task: DownloadSecureFile@1
  displayName: 'Download Certificate File'
  inputs:
    secureFile: 'CI-CD Deployment App Certificate.pfx'
4. PowerShell task – Login to CLI for Microsoft 365
We will be using PowerShell task for logging into Microsoft 365. As explained in the One-time Authentication, we already have a certificate file that will be downloaded in the release process. Using CLI for Microsoft 365, we will be logging into your tenant using the Certificate file. As mentioned in the below YAML file, the script will be part of the project and the same will be copied to the drop location for execution. Login command will use the certificate file for logging into Microsoft 365.
YAML Code
#Your build pipeline references an undefined variable named ‘caCertificate.secureFilePath’. Create or edit the build pipeline for this YAML file, define the variable on the Variables tab. See https://go.microsoft.com/fwlink/?linkid=865972
#Your build pipeline references an undefined variable named ‘CertificatePassword’. Create or edit the build pipeline for this YAML file, define the variable on the Variables tab. See https://go.microsoft.com/fwlink/?linkid=865972
#Your build pipeline references an undefined variable named ‘AppId’. Create or edit the build pipeline for this YAML file, define the variable on the Variables tab. See https://go.microsoft.com/fwlink/?linkid=865972
#Your build pipeline references an undefined variable named ‘TenantId’. Create or edit the build pipeline for this YAML file, define the variable on the Variables tab. See https://go.microsoft.com/fwlink/?linkid=865972

steps:
- task: PowerShell@2
  displayName: 'M365 CLI - Login to SPO'
  inputs:
    targetType: filePath
    filePath: './$(System.DefaultWorkingDirectory)/SPFx-CICD-1/drop/m365-spo-login.ps1'
    arguments: '-certificateFile "$(caCertificate.secureFilePath)" -password "$(CertificatePassword)" -appId "$(AppId)" -TenantId "$(TenantId)"'
Login script used
We will be having a PowerShell script in the same project folder which uses CLI for Microsoft 365. The script is given below
In the above script snippet at line # 26, you can see that the login command is used which uses the Certificate and Certificate Password for logging into Microsoft 365. In subsequent steps, once authentication is complete, the solution will be deployed and installed to SharePoint Online App Catalog.
5. PowerShell task – Deploy & install SPFx package
We will be using a PowerShell task which will execute a PowerShell script. In this script, we use CLI for Microsoft 365 for adding, deploying, and installing the solution to SharePoint Online.
YAML Code
#Your build pipeline references an undefined variable named ‘ProjectFolder’. Create or edit the build pipeline for this YAML file, define the variable on the Variables tab. See https://go.microsoft.com/fwlink/?linkid=865972
#Your build pipeline references an undefined variable named ‘ProjectFolder’. Create or edit the build pipeline for this YAML file, define the variable on the Variables tab. See https://go.microsoft.com/fwlink/?linkid=865972
#Your build pipeline references an undefined variable named ‘SolutionPackageLocation’. Create or edit the build pipeline for this YAML file, define the variable on the Variables tab. See https://go.microsoft.com/fwlink/?linkid=865972
#Your build pipeline references an undefined variable named ‘PackageName’. Create or edit the build pipeline for this YAML file, define the variable on the Variables tab. See https://go.microsoft.com/fwlink/?linkid=865972
#Your build pipeline references an undefined variable named ‘SiteCollection’. Create or edit the build pipeline for this YAML file, define the variable on the Variables tab. See https://go.microsoft.com/fwlink/?linkid=865972

steps:
- task: PowerShell@2
  displayName: 'SP Package, Add, Deploy, Install'
  inputs:
    targetType: filePath
    filePath: './$(System.DefaultWorkingDirectory)/$(ProjectFolder)/drop/spo-app-add.ps1'
    arguments: ' -PackageFolder "$(System.DefaultWorkingDirectory)/$(ProjectFolder)/drop/$(SolutionPackageLocation)/" -packageName "$(PackageName)" -URL "$(SiteCollection)"'
Script Actions
Following are the actions which will be done on the PowerShell scripts
Add package to App Catalog
Code Snippet for installing the SPFx package is given below
m365 spo app add --filePath $CompletePath --scope sitecollection --appCatalogUrl $URL --overwrite
Deploy app to the Site Collection
Code Snippet for deploying the app package to Site Collection is given below
function deployCustomApp{
    param (
        [Parameter(Mandatory = $true)]
        [string]$AppId,
        [Parameter(Mandatory = $true)]
        [string]$URL
    )

    Write-Host "Deploying App with ID : $AppId"
    m365 spo app deploy --id $AppId --scope sitecollection --appCatalogUrl $URL
}
Installing if the solution if not yet deployed
Code Snippet for installing the app package to Site Collection is given below
function installCustomApp{
    param (
        [Parameter(Mandatory = $true)]
        [string]$AppId,
        [Parameter(Mandatory = $true)]
        [string]$URL
    )

    Write-Host "Installing App with ID : $AppId"
    m365 spo app install --id $AppId --siteUrl $URL --scope sitecollection
}

function checkIfAppIsInstalled{
    param (
        [Parameter(Mandatory = $true)]
        [string]$packageName,
        [Parameter(Mandatory = $true)]
        [string]$URL
    )

    $IsDeployed = (m365 spo app get --name $packageName --scope sitecollection --appCatalogUrl $URL --output json --query "{Deployed: Deployed}") | ConvertFrom-Json

    return $IsDeployed.Deployed
}

$IsDeployed = checkIfAppIsInstalled -packageName $packageName -URL $URL

#Install Custom App
if($IsDeployed)
{
   Write-Host "App is already deployed. Hence skipping installation"
}
else
{
   Write-Host "App with name $packageName is not deployed. Installing it now"
   installCustomApp -URL $URL -AppId $AppId
}
Complete Script used in YAML Code
The complete PowerShell script file which is used in the YAML Code is given below
Sample Code Repository
You can refer to this GitHub Sample repo where I have given all the scripts and a sample SPFx project. If you are interested to know about the Project structure which has been used here, go to the Project Structure section where I have explained the folder in detail
Project Structure
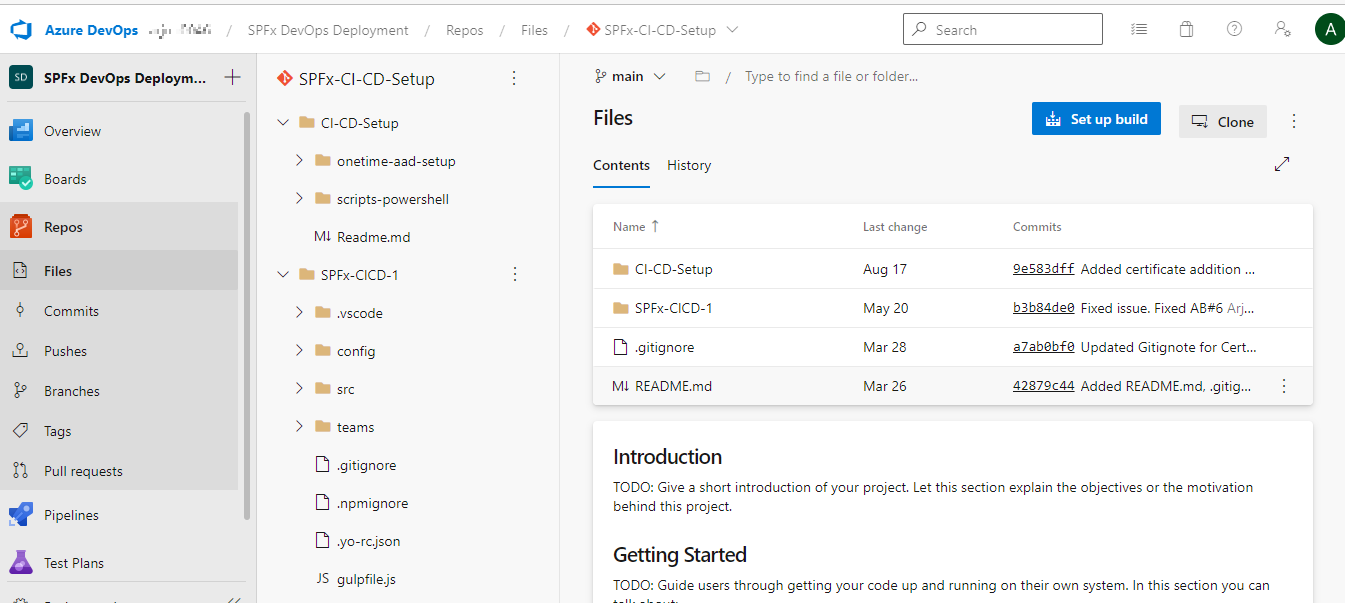
CI/CD Setup
This has the list of PowerShell scripts which is being used in the CI / CD Pipeline. This has 2 folders,
Onetime AAD Setup
This folder has the list of files that are used for setting up the AAD App Registration and Certificate. This is a one-time setup and need not be part of your actual project structure.
Scripts PowerShell
This folder has the PowerShell scripts which are being used in CI / CD Pipeline.
SPFx Folder
This is the folder where you will have your SPFx project. You can have one or more folders in the same project structure
Conclusion
This is one of the many ways where you can configure CI/CD for SharePoint Framework (SPFx) development. This will provide a framework and you can have a simple or complex CI/CD setup for managing the releases of your solution/product setup. If you see any areas of improvement or has got questions, please feel free to comment below.
Photo by Markus Spiske on Unsplash